.NET 5.0, ORACLE, ASP.NET Identity with N-tier architecture-Part 02
In this part of our tutorial, we will dive into creating basic project structure for N-tier project including creating base repository and creating data layer, creating service layer and using all of newly created stuff in our Web project.
First things first, in previous part we have created our context with entities, explained how to create migration (code first approach) with Oracle database using EFCore and how to scaffold existing database entities into our project (database first approach). Now we will put everything in use through couple of design patterns in multiple layers.
Data logic layer and Repository Pattern
First pattern that we will implement is Repository pattern in our data-access layer. Our code will create generic IBaseRepository with CRUD operations that contains INSERT, UPDATE, DELETE and SELECT operations and later we are going to add implementation of IBaseRepository.
Entity Framework already implements the repository pattern as we can access, add, modify and delete entities through DbSet. We are creating generic IBaseRepository interface and implementation of that repository to avoid boilerplate code for CRUD operations of every repostory for each entity.
Now lets create generic interface IBaseRepository with basic CRUD operation.
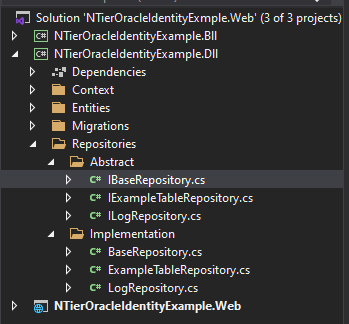
Add IBaseRepository interface class in Repositores/Abstract folder of DLL project:
The IBaseRepository interface accept one generic type T. T as defined must be a class, so it must be entity just like one from our Entities folder in DLL project. As previously explained our generic IBaseRepository interface is defining base CRUD operations that we will implement later in our BaseRepository implementation. Lets create implementation of our generic IBaseRepository.
Add BaseRepository implementation in Repositores/Implementation folder of DLL project:
Your project structure should look like this.

Now, next step would be for us to implement entity repository for our database entities. In previous chapter we have created two entities: Log and ExampleTable. Lets create interfaces for our entity repositories and implementation of those repositories. First add ILogRepository interface in Repositores/Abstract folder of DLL project:
Next, Add LogRepository implementation in Repositores/Implementation folder of DLL project:
Now lets do the same for our second entity ExampleTable. First add IExampleTableRepository interface in Repositores/Abstract folder of DLL project:
Next, Add ExampleTableRepository implementation in Repositores/Implementation folder of DLL project:
As we can see, we are extending BaseRepository in our entity repositories. In ILogRepository or any other interface we can add additional methods that are applicable only for that entity. That is why we are extending LogRepository as BaseRepository and implementing ILogRepository. BaseRepository contains basic CRUD operations and ILogRepository contains entity specific methods, procedures and other LINQ code.
Your project structure should look like this.
Business logic layer and Services
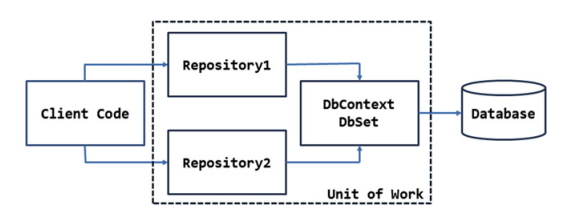
Now that we have implemented the repositories in our DLL project it is time to move to Business logic layer project to implement our services which will implement Unit of Work pattern. Unit of work pattern tracks a business transaction and translate that transaction into database transaction. For example if we have ten steps for our business transaction, and those steps are connected with business logic in some way, we can collectively run that transaction as one unit.
Implementation of Unit of Work pattern should look like this.
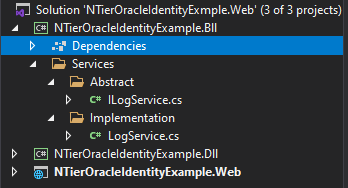
So lets create ILogService, IExampleTableServices interfaces and LogService, ExampleTableService as implementation of those interfaces.
Our BLL project structure should look like this:
That is it. Unit of work consist of multiple repositories that implement some business logic, incorporating all of them in single service.
Dependency Injection
So what is our next step? Next we are going to use our repositories and services in our controllers. We are going to inject repositories into our services and later those services into our controllers which is a technique for achieving Inversion of Control (IoC) between classes and their dependencies. There are multiple libraries that allow us to inject needed dependencies of a class, but we will use standard ASP.NET CORE DI framework for injecting our dependencies.
Before we dive into code, lets explain 3 lifetime modes for service being injected:
- Scoped - lifetime services are created once per request within the scope.
- Transient - lifetime services are created each time they are requested.
- Singleton - which creates a single instance throughout the application. It creates the instance for the first time and reuses the same object in the all calls.
Lets open Startup.cs class and in ConfigureServices method inject our DBContext and needed services and repositories.
AutoMapper mapping between DLL entities and ViewModels
Next, problem that we are going to solve is problem of mapping of our DLL entities that are generated either by code first or database first approach. Every time we need to modify our entity we loose DataAnotations and we need to apply that change again, or we need to add new properties to every entity where we are copying data and change our logic for copying one object to another in our code (Entity to EntityViewModel and vice versa).
The AutoMapper in C# is a mapper between two objects. It maps the properties of two different objects by transforming the input object of one type to the output object of another type.
Lets first install AutoMapper either through GUI on our web project by Right Click on Dependencies of Web project and then Manage NuGet Packages

or executing following PM console commands on Web project:
- Install-Package AutoMapper -Version 11.0.0
- Install-Package AutoMapper.Extensions.Microsoft.DependencyInjection -Version 11.0.0
Next in our Startup.cs class in ConfigureServices method add next code:
Next, lets create ViewModel for our Log and ExampleTable entity classes:
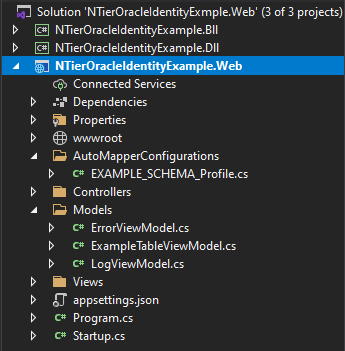
Next lets create AutoMapperConfigurations folder in NTierOracleIdentityExample.Web project. Then create new profile called EXAMPLE_SCHEMA_Profile class in newly created folder:
As you can see from previous code, we need to map each property of entity class to the correspondent ViewModel class using AutoMapper.
Note: When the property names are different in Source and Destination types, then by default the C# Automapper will not map those properties.
Our Web project structure should look like this:
Wrapping up Controller
Last, lets add some code to our HomeController. We will inject ILogService and IMapper interfaces in contructor of HomeController. Next we will add some dummy methods for CRUD operations of our service, like GetLog, GetLogById, EditLog and DeleteLog.
So, that is it for this part. In next part we will cover the ASP.NET Identity with ORACLE database and how to create needed entities in database for Identity and how to implement it in our application. And finally run our application.